 It all began when I saw a beautiful photo of a Phoenix Rooster. The tail was magnificent in shimmering, silvery blues. I just had to capture that feisty look too, and it took a while. I sketched a few ideas and created a pattern. I started locker hooking something that looked way too much like a chicken, so I started over. I created a new pattern and locker hooked some more, changed colors a gazillion times, changed the pattern along the way about 10 times, and then, finally…I was at the point where the locker hooking was completed, but it wasn’t until I stitched on the rooster’s eye…wow, it just seemed to come to life, and I love the way it turned out.
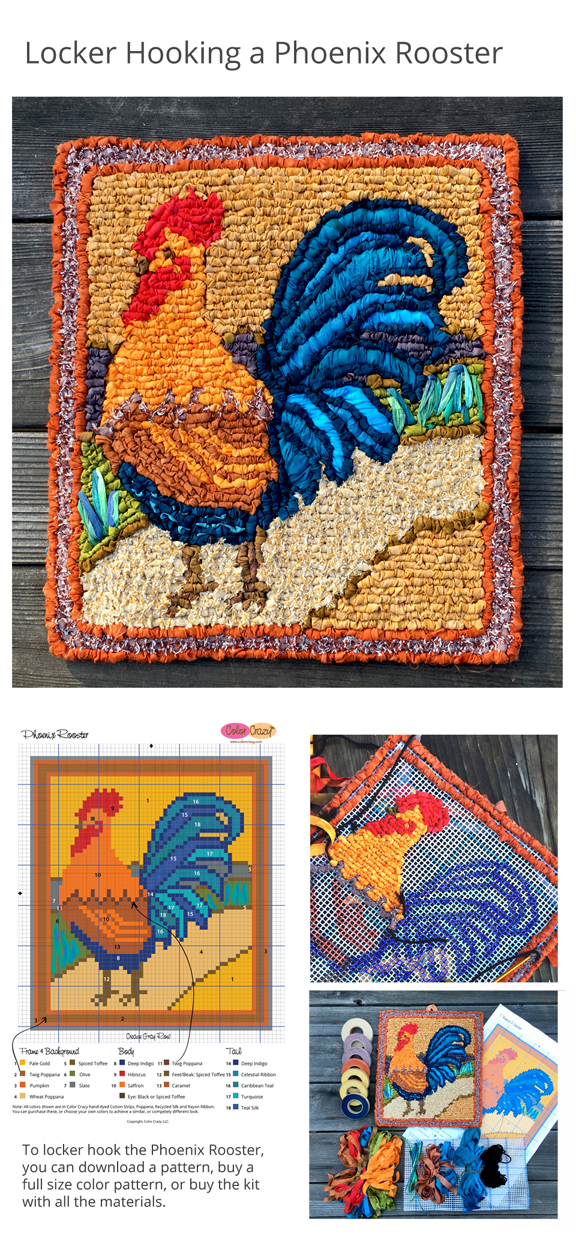 You can locker hook your own rooster by downloading the free pattern, buying a full size color pattern with instructions or a Color Crazy kit with all materials. I also created a Rooster Tips & Techniques video–a short one covering key techniques with my recommendations.

Ready To Hook a Rooster?
If you’re ready to give it a try, and don’t have a varied stash of fabric to use, I highly recommend buying the Phoenix Rooster kit. If you have some fabric but need key colors, buy the Color Crazy fabric strips. I chose to use Poppana (woven fabric cut on the bias–also included in the kit) fabric strips because of the texture they create. You could customize it with your own color choices.
I highly recommend using permanent markers to mark the pattern on canvas. It’s challenging to transfer a pattern to canvas, but here’s an important tip: the blue lined canvas is a great help if you match lines exactly before you cut the canvas. It’s much easier to mark and follow with blue lines as your guide. If you make a mistake, use white-out for stationary to cover it, let dry, and mark over.
“…here’s an important tip: the blue lined canvas is a great help if you match lines exactly before you cut the canvas. It’s much easier to mark and follow with blue lines as your guide.”
It can get quite messy so tackle one design element at a time. For example, you can start by hooking the outer frame, then follow with the head and chest, the wing detail, the path, tail feathers, belly, and so on. I filled in the top background at the end. I also decided to use the ruched frame technique for the tail feathers. I wanted them to stand out. If you’re not feeling like hand stitching the feathers, you can just locker hook them.
It was a messy process, I must admit. I ended up with a nest of fibers and fabric strips I had discarded. While testing different colors, I tried different yarns and fibers for certain areas like the feet and comb, and ended up with fabric strips. The raffia was an idea toward the end that added a nice touch for the landscape.

In the Works: Locker hooking the rooster
“It was a messy process, I must admit. I ended up with a nest of fibers and fabric strips I had discarded.”
Too Many Tails?
Once you’ve finished the locker hooking part, you’ll be left with a bunch of tails on the back side. You can pull them up and sew them in…or, if you’re planning to add a backing (I highly recommend that you do), just clip the tails to 1 – 1 1/2″ and cover them with the backing.

Adding a backing is easy if you just glue it in place. Here’s how…first cut a piece of fabric with a 1/2″ seam allowance. Steam press allowance under, test and adjust to fit by pressing adjustments. Cut iron-on fusible to size and press on. Machine stitch a top stitch 1/4″ inside edge. Use fabric glue like fast-drying Quick Grip to glue backing on. If desired, stitch on a hanging loop made from ribbon or twine before gluing backing.

Now that this Phoenix Rooster is hanging in my studio/office, I think he may need a mate. Maybe that chicken design is not such a bad idea after all.